Categories
Baha'i Holy Day Ideas Children class

3 Easy Ways To Create Resources for Ruhi Children’s Class

Some of you may already be members of my platform for neighborhood children’s class and use the resources I develop, if not, then: here is the link to Grade 3 and from there you can access kindergarten to grade 4. Today I would like to highlight one of the places for developing your own content, called Canva. It is super EASY to use and I have the feeling that soon I will be visiting your lesson plans to download your amazing resources. I will share with you 3 easy ways to use Canva to create content that you can do today, right after you read this post!

The first easy way to use Canva

Once you create your free account here is where I would start: Go to the “templates” tab on the top of the screen. This tab has many types of templates. the post today will highlight 2 ways to use use a template. I use the postcards template to create the downloadable, printable postcards with lesson quotes and prayers on them. Just like my post here. Postcards template is just one of the many free templates that can be accessed. there are paid versions of all the amazing resources on Canva so you always have the option to go above and beyond with a paid image. All I do is find a postcard with an image I like, and then change the text to what I want: a prayer, a quote, or any other piece of information that you need.

The second easy way to use Canva

The other template I use falls under “education” in the worksheet category. There are tons of worksheets that are suited for any level of Baha’i Children’s class. I use the worksheets for word definitions, fill in the blank, re-telling of a story, drawing, and much more. Here is an example of one of the worksheets I used from the template called “Cathematics”. I liked this template for the boxes which I modified. I also tend to delete the grade, teacher and date sections on the top and of course change the title. Most of the time I keep the graphics but as you will see in the next image, I did get rid of the cats.

Here is my edited version which took no time at all. I changed the title, the information in each box, I got rid of the cats, and added another box by using the copy and paste feature. Then I customized it a bit more by adding a rectangle for each box heading and filled it in red to match the box line colour. Five minutes later I had the cards that I needed to be cut out for the lapbook.

The step that always takes the longest for me is choosing a template that really fits the need. Once I have a template that works for something, I make a copy of it and use it for a similar lesson plan item. One such template is what I use in the Grade 3 lesson for the review quote. This template is set up for a fill in the blank model and I love the look of it. Each lesson has a different background which you can obtain from Canva free stuff or from other sites like Creative Fabrica digital paper.

Make sure that once you create a template of your own to use to create a copy each time you need it for another lesson. If you don’t the new information will be saved and you will loose the previous information. I did this a few times and although no big deal, i did have to go back and recreate it later in some situations.

The third easy way to use Canva

One last way to use use Canva is to create something from scratch. Under “create a design” on the right side of the screen are many size options from Instagram posts and infographics to a plain 8.5 by 11 worksheet. The 8.5 x 11 option is my go-to size and I use it for creating things like story prop images to print and other types of fill-in-the-blank resources. It is just a blank document so go wild filling it with images, writing, shapes, color, and more.

There are many other features to use in Canva and I am sure that once you develop your first few pieces, you will be eager to dig in and learn more. I use Canva for my Baha’i feast reports and the community likes the infographics created with Canva. I also use Canva to create beautiful pages with readings for our 19 day feasts.

I hope that you find Canva as great a resource for your classes as I have, and I look forward to using any resource you develop and are willing to share.

Thank you for reading, and hope to hear from you all.

Carolyn

Categories
10 minute craft Baha'i Holy Day Ideas Kids Can Do Paper Template

Feast of Words/Kalimat

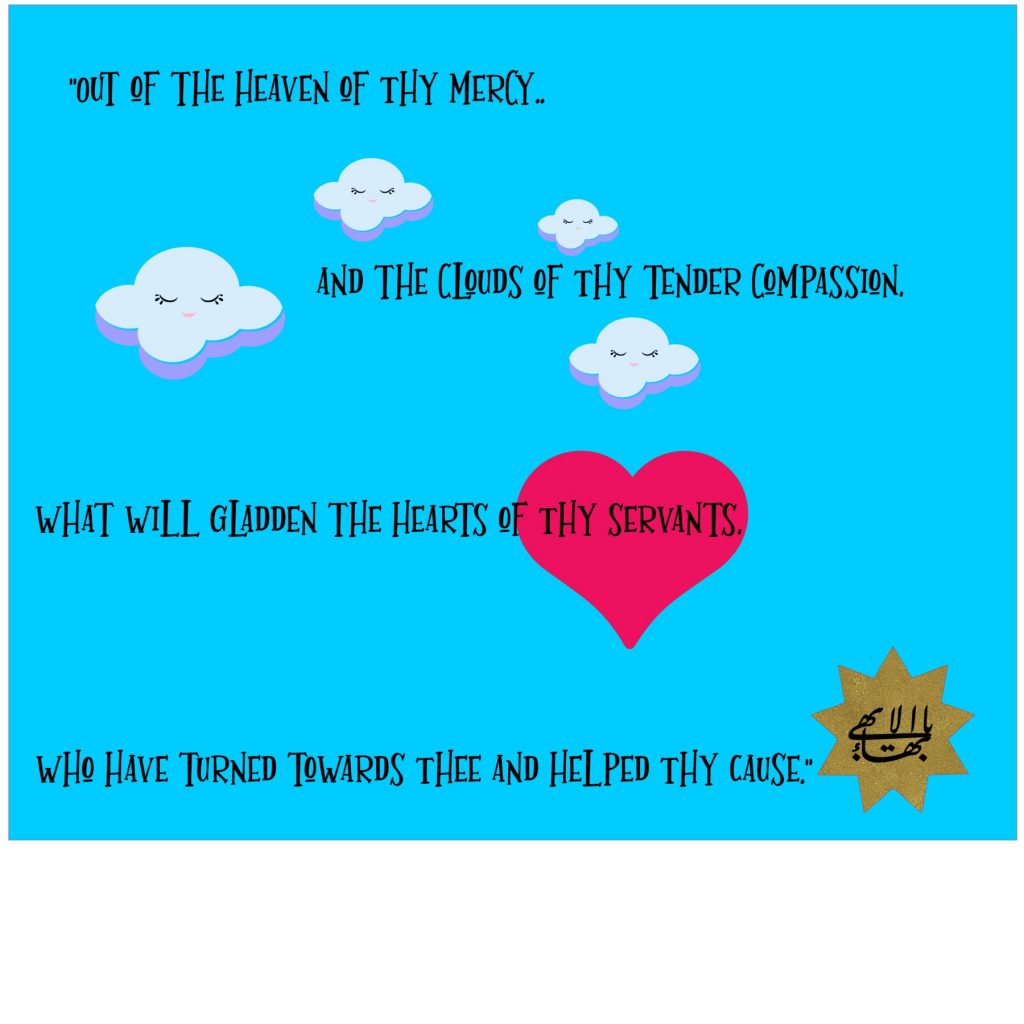
“The Word of God hath set the heart of the world afire; how regrettable if ye fail to be enkindled with its flame!”

Gleanings From the Writings of Bahá’u’lláh … – Bahá’í Reference Library

Welcome to the resource for the Feast of Words. First a few suggestions on activities that are not craft related:

Play a word game using simple words the child can recognize such as : “We”, “Are”, “Baha’i”, “love” etc.

Cut out blank cards or use index cards and write simple words on them . A word game like go fish can be an activity to play or just use the cards as flash cards.

Craft: make the card (template  below) to give to someone at feast 

This is the coloured version that can be used on a card or to frame:For the children, this is a very simple activity that takes 5 to 15 minutes.This craft uses cotton balls for the clouds, Sparkles if you want to add to the sky or cloud or the Greatest Name, and the template picture to colour in. 

Time: 5 minutes.

What you need:

  • Template
  • Cotton wool 
  • glue ,crayons, markers or paint
  • glitter

Method:

  • Colour in parts or the entire picture with crayons, markers or paint.
  • Glue cotton to the clouds.
  • Apply glue to areas you want sparkles on and apply sparkles.
  • Shake off extra.
  • enjoy

Here is my example…took 5 minutes. I used only paint and sparkles.

Feast of Mercy

Hope you have fun: template is below

Categories
10 minute craft Baha'i Gift ideas Baha'i Holy Day Ideas Free Greeting Cards Template

Card for The Feast Of Mercy

Word Art

Here is a fun and easy craft using word art . Use the images as you like or follow the easy steps below to make a cute card. Or download my template.

This activity is easy and suitable for all age groups. All you need to do is print, cut, glue, decorate the images and then enjoy.

So what are you waiting for? Let us jump in and get started!

Where to Use

You may wonder what to do with this card once the kids make them. Here is an idea: use this cards as a gift to give someone at the 19 Day Feast. Another idea to use the cards is to take them with you on a home visit.

If colouring is more your thing, then you might like my post for Feast of Mercy with a colouring activity.

This craft uses the following quote :

“O SON OF MAN! My majesty is My gift to thee, and My grandeur the token of My mercy unto thee. That which beseemeth Me none shall understand, nor can anyone recount. Verily, I have preserved it in My hidden storehouses and in the treasuries of My command, as a sign of My loving-kindness unto My servants and My mercy unto My people.”

You can choose any quote you like and use the website generators to produce lots of exciting activities like colouring pages and posters.

Resource Links

The online resources to generate these images and PDF are amazing with lots of other fun activities!s So continue reading below to find out more.

Spirals makes me dizzy!

This Spiral word art is from the site Festisite . This site allows you to make stuff , like logo maker, word cloud , posters, traffic signs and more.

The image above is the spiral image we will use to make the card but get creative and use it as you choose.

For instance, show the letter “M” for “Mercy” and have the kids look for and circle all the “M’s” in this spiral.

I “HEART” this

The next image is a word cloud using the quote “O Sone of Man” from above. To make a word cloud yourself, visit the site Festisite, Typing your quote, and its is that simple.

word cloud using the quote above

Flowing waves

The wave image below, uses the same quote as the other images above , and is available as a PDF. The word search puzzle on the other hand is from another site called Discovery Education

Wave formation from Festisite using the quote O Sone Of Man

Some people and kids don’t like to make stuff but may enjoy a puzzle like the word search below. Again this is easy to make using the link for Discovery Education, so give it a try.

Who loves word searches?

pdf word search
this is the PDF of the words each using the quote O Son Of Man…

Now for the fun part: let us make a card. To do this follow the simple steps below.

The easier Card

  • Print the images you want to use : size them to 4″ x 6″ ,
  • cut the images out
  • fold a 8.5″ x 11″ cardstock in half, this is the card base.
  • Glue your image to the front and decorate as you choose.

The EASY Template Card

  • Print the template (see below)
  • cut everything out.
  • fold the card base in a “Z” shape: see photo below)
  • The template has 2 coloured “base “pieces these glue to the front and back of the swing section.
  • Glue or stick the image you cut out to the card.this can be on the front or back of the swing section
  • Decorate the other side of the swinging section
  • The front of the card can be decorated with ribbon, paper, stickers…whatever you have on hand.
    DONE!

Two Template to Download

Join my list to get more free items!

Categories
10 minute craft Baha'i Holy Day Ideas Celebrations Events Greeting Cards Kids Can Do Ridvan Template

A 10 minute Craft for Ridván

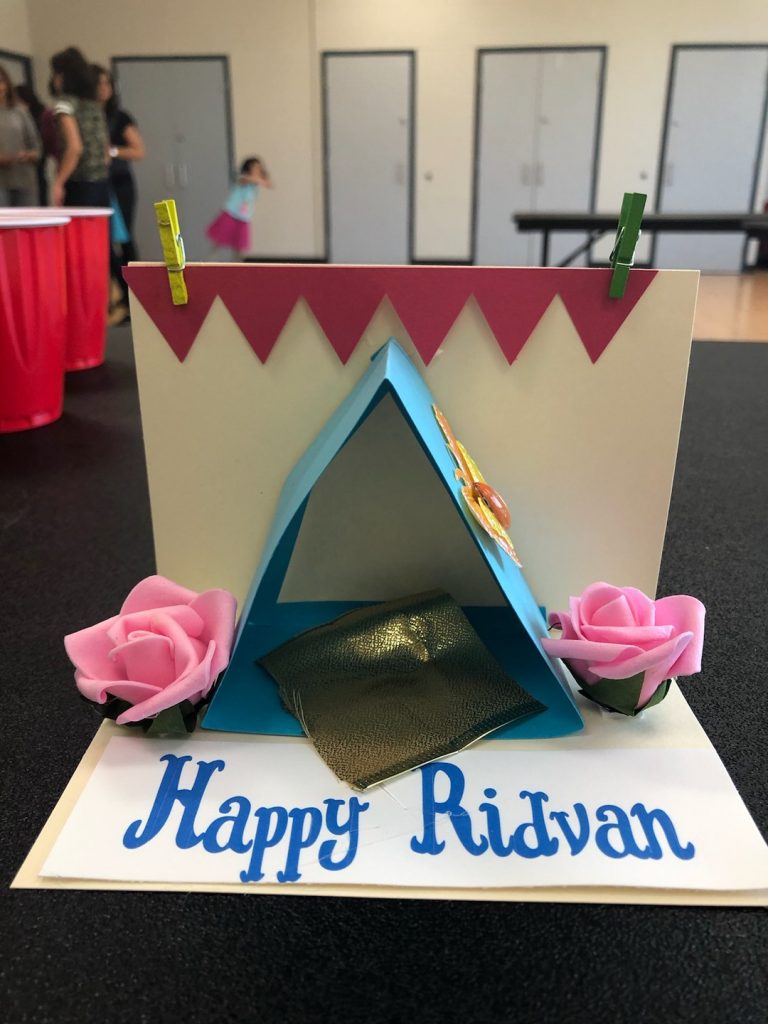
This is simple craft that you can print for Ridván for kids of all ages to do. This particular craft was put together at the Burlington children class.

The Parts

This is a small display of the Garden Of Ridván that consists of:

  1. The tent of Baha’u’llah
  2. A banner
  3. a “Happy Ridván” tag
  4. flowers
  5. Some embellishments of your choice.

What you Need

The supplies are very simple, for each display you will need:

  1. Cut 8.5 x 11 in half cardstock width wise. That means you will have a card that is 8.5 x 5.5. this is your Base. Use my template to print and cut.
  2. Cut a strip of paper 11″ x 2.5″ This is your tent
  3. cut a piece of with ribbon or material fo the “carpet”
  4. Print and cut the Banner
  5. Print out the “Happy Ridván” tag or write your own
  6. Print the pattern for the roses or buy from dollar store.
  7. Embellish with stickers , images from magazines or print and cut images you like such as butterflies, flowers, birds etc.

Assemble

The Assembly is very easy.

  1. First take your base that was cut 8.5 x 11 and fold in half so your card is 4.25 x 5.5. open it so that it is 90 degrees, you have a base and a back.
  2. Take the strip of paper that is for the tent and fold in half so you now have 5.5 x 2.5. Next on each end bend the edges back by 1″ to create a tab. Glue the 1″ tabs on to the base of the card to form a upside down “V” that will be the “tent”
  3. Put the mat inside the tent.
  4. stick “Happy Ridván” on base of card
  5. Glue flowers around the tent
  6. Glue the banner to the back of the card or use small clips to hold in place
  7. All any other embellishments you like such as birds, butterflies etc.

Template

Downloads the template in PDF, SVG and PNG here.

Categories
Baha'i Gift ideas Baha'i Holy Day Ideas journal Paper Ridvan

Update on Baha’i Inspired Journal

If you are following my journey as I collaborate on creating a journal that is inspired by a Baha’i way
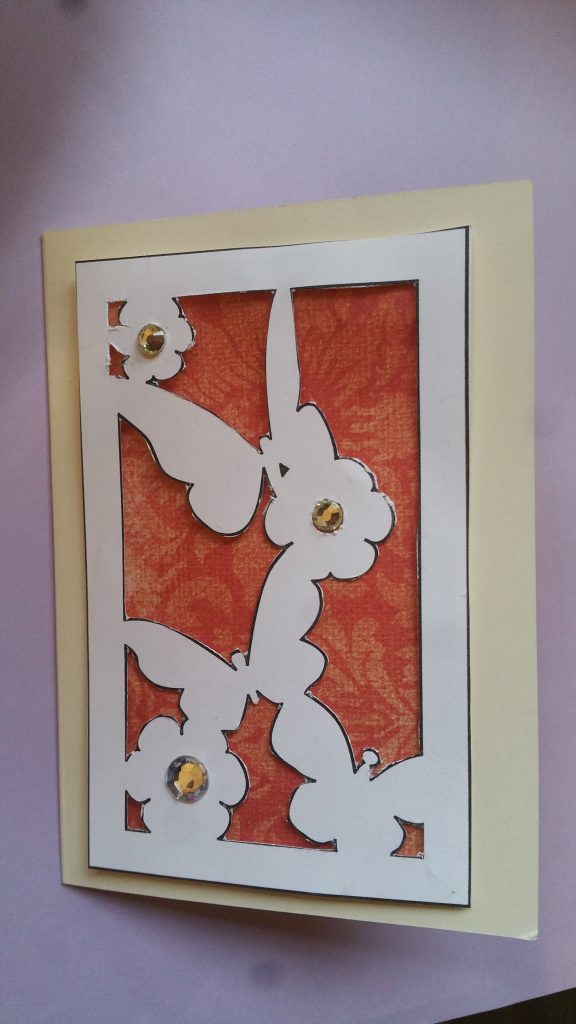
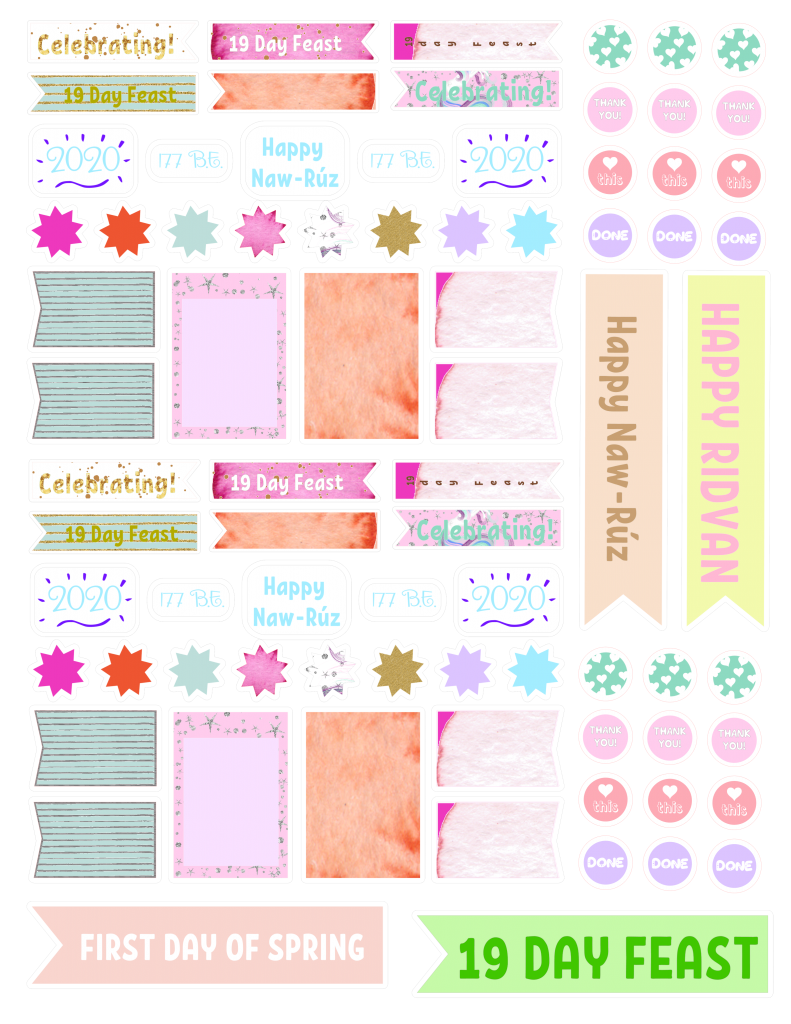
 of life then here is the latest update.

The journal is now ready for download but not yet for print. the downloadable version will include:

  1. Months March to Dec 2019 and Jan to March 2020.
  2. Mandala to colour each month
  3. Monthly view: shows the names of the Baha’i months and special days
  4. Monthly goals setting
  5. Monthly habit tracker to track things like reading the writings, Prayers etc.
  6. Monthly ” things that make me smile” to record the little things in life that make our day worth getting up for.
  7. Monthly “What I am thinking about” page is a space to keep all your great ideas and plans
  8. Monthly space for tracking if you are reading/ want to read/ thinking of reading. Things you are listening to/ want to listen to/ thinking of listen to such as podcasts, lectures etc. Events you are attending like conferences or even feast and Holy Days and last a space to track service projects.
  9. Weekly views with special Baha’i events marked
  10. weekly meal planning page
  11. Daily view records lots of info from schedule and daily meals to who you want to pray for. each daily page has a quote to read and meditate on.

So this journal has been a work or love and is full of stuff we wanted in our own journals that are missing. If you download, please send us any feedback for next years version. We are also including the stick sheet that is sized for areas of the journal. Since these are not standard Avery sizes you need to print on an 8.5 x 11 sheet of sticker paper and cut by hand.

looking forward to your comments.

Download directly from my Etsy store here: Price is $14

OR

Email transfer to me and a link will be sent to download: price $12

Carolyn

Categories
Baha'i Holy Day Ideas Cards Free Greeting Cards Paper Ridvan

Paper cutting in 10 minutes

When I am stressed or need to relax, I find that cutting paper is so soothing. The supplies are easy to find and cheap: an X-acto knife and paper with a printed design and a cutting board.

This paper craft is suited for teens and adults and can take 10 minutes to 30 minutes to complete.

I first started to notice paper-cutting when searching crafts like Origami and Kirigami: beautiful intricate paper-cuttings were showing up in my feed. So, while I admired from afar, I did not think I could do such detailed work.To make a long story short, I eventually tried it out, loved it and have been cutting and designing paper cutouts ever since.

The photo below is one of my designs that was inspired by the Ridvan Garden.This was made to go in a shadow box and hang on the wall. This design has lots of small leaves that have to be cut out and it is not an easy design to start with.

Paper Cutout of birds and flowers
A paper cutout 12 x 12 of birds and flowers inspired by the Ridvan garden

What to look for when choosing a design to cut:

When looking for a beginner level design AKA an easy craft, you want a design with large images. Straighter lines are the best for beginners but not always possible so larger gentle curves are next best option. Open space between the design elements also help.

Here is what you need to get started:

  1. A printed design : I have two included, one is simple, one a little more detailed. Best to print the design on 8.5 by 11 cardstock. You can print on any colour cardstock or regular paper. If printing on regular paper, be extra careful and it will tear easier.
  2. A printer or send file to a print service near you.
  3. A sharp X-acto knife: you may have to change blades
  4. A cutting board: A self healing mat is great but even a wooden bread board can work, just be careful the knife point does not snag on the wood fibre.

Beginners design:

The photo below looks like a pretty easy design to cut out and it can be made even simplier for beginners.

Easy paper cutout

When you are looking for a super easy first design here are some of the things to note:

  1. Note that the butterfly wings above are jagged curves, I would look for a smoother curves in a design.
  2. The inner circles of the flowers can be problematic to cut, so if you do print this image out, you can choose to not cut this part of the design. The printed image is the back of the finished product so the lines will not show. If you want to have the lines show that is also ok.

Notice that the curve of the butterfly wings are smoother . This is now a simple paper cutout and if printed smaller can still be cut by a beginner.

This is an even easier image to cut. The file included is with the circles in the flowers: do not cut the circles or other small areas out and you will achieve the image below.

To have a super easy cutting experience:

  1. Cut the main image out with a scissors or X-Act knife and metal ruler: the outer edge of the big rectangle in this case.
  2. Use a sharp blade and cutting mat.
  3. Don’t cut the inner circles of the flowers and the small areas. You will loose details but this can be addressed by adding embellishments like gem stickers to the center of the flowers to help bring some detail back.
  4. When cutting curves, turn the paper as you cut: this will help with a smoother cut.

How to Start Cutting:

I start cutting from a corner. You can start anywhere you like. I slowly work my way up to the top of the design. Once cut I turn the design over so that any black printed lines do not show. You can have the black lines showing if you like.

TIP: For circles or curved areas, don’t try to cut the edge of the circle/ curve , instead make straight cut lines from edge to edge inside the circle this makes it easier to cut out and a bit cleaner finish.

I printed my design small and it took about 10 minutes to cut. The white cardstock is softer than the pink and you can see the difference in how it cuts.

I choose the smaller size as I thought it would be great for the front of a card. If this is your first time cutting, I would print larger size and practice. Also note that you cut the printed design and this is the back, if your design has letters you need to mirror the image for printing.

Here are the two files one is exactly the same as the butterfly and flower above and one is a simpler version of 3 butterflies and 3 flowers. I hope that you share your finished craft with me!

Carolyn

Categories
Baha'i Gift ideas Baha'i Holy Day Ideas Bullet Journal Celebrations Creating files Naw-Ruz Paper Ridvan Template

Bahá’i inspired Journal

Love journaling but can’t seem to find a great Baha’i Journal? We are developing a Baha’i Inspired Journal just for
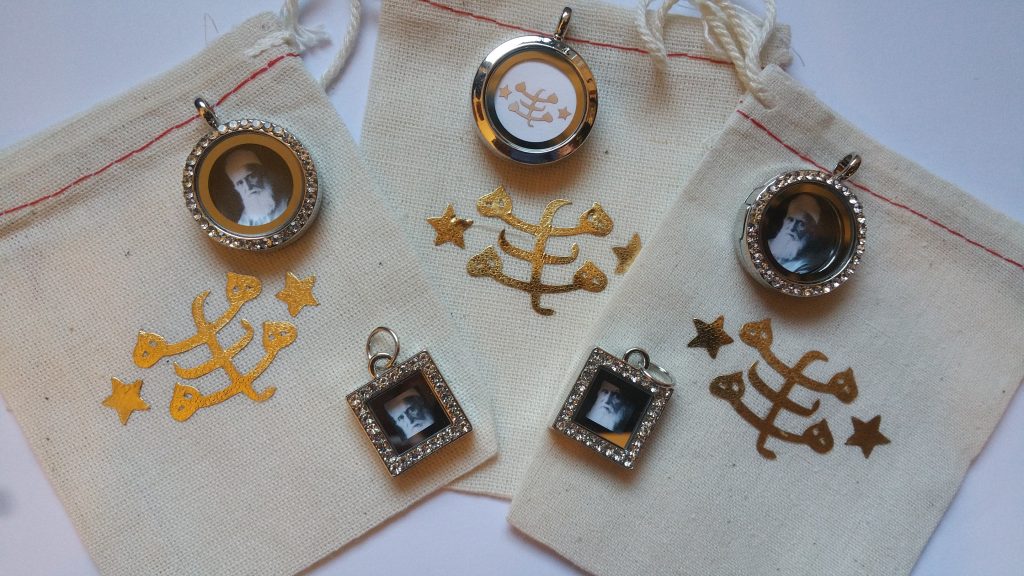
 you!

Yep! Here is how it happened: a few of us on a Facebook group page got talking about the lack of a good Bahá’i journal and Lo and Behold a collaboration was born! We were looking to release it at Naw-Rúz but there was so much more planning and organizing to do than we thought, so we have only March and April done! Yeah for us!

For sure Ridván will see it available for download or print.

We think that this will make a great gift ideas for those who love to journal. If you need additional ideas for Holy day gifts, check out the easy pendant idea!

What does it look like?

At first we were playing around with each month having different colours but now we are thinking to just keep it simple.

Here is how we planned the layout:

  • The cover is a mandala with ta 9 pointed star.
  • The inside cover has a quote
mandala with nine pointed star
Image we will use for the cover of the Journal.
  • Next pages are the yearly Bad’i Calendar and the page opposite are the important Baha’i dates
  • Each month starts with a mandala to colour
  • Then there is a monthly calendar with all the important events happening like feasts and holy days
  • Each month will have a place to set goals for the month and the action steps for each.
A place to set some goal for the month
  • Then we saw a beautiful info-graph on what is needed to lead a Baha’i life and we turned this into a habit tracker for each month
  • We all need to remember the things that made us smile along the way and keep track of the random idea and thoughts. We gave these a page for themselves in a very free form manner.
  • I am always trying to remember a book I wanted to read or did read.
  • A piece of music or a podcast I want to remember
  • An event to attend
  • A service project I am involved in or would like to do: this page is a visual representative of that.

Weekly view:

  • For the weekly view we have each week of the month at a glance.
  • A planner for meal plans and exercise

Daily View Records :

  • The day, the Baha’i month and if there is a feast or holy day.
  • There is a quote inserted in the banner section not shown here
  • Quotes you love of want to remember
  • Appointments
  • Tracking a habit
  • Tasks
  • Meals
  • Who you are praying for
  • Space to record personal, work and home
  • A space to reflect

Then it is a repeat of these pages for each month.

We would love any feedback on this journal.

Download your free March / April and if you want to sign up for notice when the journal is complete then please do so here.

Carolyn

Categories
Baha'i Holy Day Ideas Celebrations Events Free Kids Can Do Template

DIY easy craft in 10 minutes: Kids can help!

I am always on the look out for an easy craft that kids can help with. I like crafts that kids, can do that are not just paper plates, tissue paper etc. Those types of crafts are nice but sometimes I want an extra wow factor. This year I was looking for a Naw-Rúz gift.

For those who have never heard of Naw-Rúz it is the Baha’i New Year, which falls in March, sometimes it is on the 20th and sometimes on the 21st. Many other people around the world celebrate this time of year also.

This year Naw-Rúz on the 21st  March and it marks the Vernal Equinox in the Earth’s Northern  Hemisphere and the Autumnal Equinox in the South—that day when the sun’s light strikes the Equator directly and illuminates every continent equally.

Shopping for Naw-Rúz is like shopping for any major holiday where gifts are exchanges. The shopping experience can be frustrating, fun, overwhelming, happy, sad… you name the emotion we most likely experience it. Like everyone during a festive season, we went looking for the perfect gifts. Although we did get great gifts, it felt like they did not reflect the holiday in a special way. For those of you with young kids, well I think online shopping looks very appealing right now and you are thinking there is no time to make anything personalized. Well read on and I promise this is a 10 minute easy mini craft for you and the kids.

My 6 easy steps to making a personalized pendant

So, here is what I decided to do in a few really easy DIY steps that even if you have newborn triples it will be finished in under 10 minutes, I promise (not including the purchase of course!) .

It took me less than 10 minutes to do 6!

Step One

I went to Michaels and found theses very cute pendants: 2 in a pack for about $14. The pendants are in the jewlery making section and I am sure any craft store will have something that you can use that is similar. Michaels always has a coupon so make sure and use it. This time it was 40% off

Package of 2 pendants: one round one square

Step 2

Next I printed a photo of ‘Abdu’l-Bahá the Son of the Baha’i Faiths founder Baha’u’llah) and printed it on white regular cardstock. You can of course use any photo or symbol.

I choose the photo and not just crystals or little heart charms because I remembered my two friends discussing the best gift they received as children. I am sure the gifts my friends discussed was not a photo in a costume jewelry pendant like mine, but they loved this gift from their mum! I think it was because it was so small and wearable and different from the other gifts they had received.

The photos of Abdu’l-Baha needed to be small enough to fit the frames.

If you buy the same frames, the size for the square frame is 2/8 inch and the round is 3/8th diameter.

Here is a link to my file for you to download and print. Or you can find a photo you like better by searching Google make sure that the usage rights allow for reuse.

Step 3

I cut the photos by hand. There is no need to be exact as they are so small little imperfections really do not show.

TIP: for cutting anything round, move the paper not the scissors, it is much easier that way.

Step 5

The next step is to remove the little mockup photo that came with the frame. I used this weeding hook I had with a piece of sticky tape, this grabs the insert really easily and pulls it out. You can also use a straight pin to push the photo out from the bottom of the frame

Step 6

The final step, put the images into the pendant. The square image inserts on the top. The round pendant opens on the side with a magnetic closure. The round pendant is also glass on two sides so the back of the photo shows. I decided to put a Baha’i symbol so the pendant can be worn either way. I have included it in my file for download. Cut the photo of `Abdu’l-Bahá and The Greatest Name and stick back to back then insert into the round frame

You are done!

You can stop here. What do you think? pretty easy DIY project right? I think it turned out beautiful.

I went and did a few extra steps.

Optional

I have some blank little bags that I will put the pendant in and so I will decorate them.

You can find little bags in the dollar store if you want to venture out or use my little rectangle box template: It should take about 5 to 10 minutes to print, cut and glue it together.

I have a few heart shaped boxes  in red that I painted white with dollar store craft paint. I am still deciding if I like this container for this special gift.

If you want a box to put your gift it, here is a link to my square template box with a lid.  Decorate it as you like.

Download Photo and small square box template here

Categories
Baha'i Holy Day Ideas Cards Paper Template

Easy steps to make A Twist and Pop Card