Categories
10 minute craft Cards Children class Greeting Cards Kids Can Do Pop Up Cards

2 Easy Cards In under 10 minutes each

For those of you who know me, I try to help out with the local children’s class and provide the crafts. Although it can be a bit of work, it is always enjoyable. During COVID this activity went to nil. It gave me the opportunity to put lessons up on an online platform, with all the lovely activities in one place. These 2 easy cards are all about prayer and use a simple popup card template and a popular with the tracing of the child’s hand. Any child from 3 to 11 would be able to finish this in under 10 minutes.

Let us start with the very simple popup card. This is a template that you can print and cut out (subscribe below to request it) or if you want to join the mums teaching the children in your neighborhood, you can download for free from this site with access to the full lesson,

How to make the first easy card

This first easy card is a popup card.

The most time spent will be in cutting it out of the printed template. Assembly should take 5 minutes.

  • Download and print the template
  • cut out the base, there are 2 per page
  • cut out the cover
  • Print and cut out the prayer

When you are cutting out the pieces, the straight lines are cut lines and any dashed/dotted lines are to be folded. The folded lines are only on the card base in the middle.

Base for popup care and prayer
Cut out pieces for first easy card using the free template and a printed prayer

Once the pieces are cut out, take the base and push the partially cut middle out. This is the only tricky part if you are not familiar with popups. take a look at the photo below

Side view of popup card
Side view of popup card. So Easy when you get the hang of it!
front view of popup card

The rest is easy! Glue the prayer onto the popup section.

Here is the finished card with a little bit of decoration

Easy Craft #2 is a prayer hand

This second easy to make card really is super simple. Trust me!

To make the prayer hand you will need 

  1. Cardstock  about 6 in x 11in or larger
  2. Pencil
  3. Scissors
  4. printed prayer or quote
  5. Child

You can see the slide show here or enroll for free to access the entire class on Prayer Here

  • Fold the paper in half (your paper is now 6in x 5.5 in)
  • Place the child’s hand on the fold of the paper
  • Use a pencil to trace the hand. The fingers can be together or apart.
  • Try to get as much of the fold as part of the drawn hand as possible as this gives more space for the prayer to be stuck.
  • Cut out hand shape.
  • open and glue the prayer to the hand. You may need to trim the prayer if too large
  • Decorate

Photo Steps

Trim if too large

Tring exsess paper if there is overhang

The card is finished!

Well, that is it. Let me know if you made any of these easy cards or even both! The lesson on Prayer is available to anyone who wants it and if you don’t want to enroll for free, you can always request the PDF version with all the links to the video content that I have created.

Subscribe here

Categories
Cards Celebrations Events Greeting Cards Kids Can Do Paper Pop Up Cards Service project Template

POP UP CARD: CAT

My popup card was made by the children when they went to deliver gifts of old blankets to the animal shelter.

This is an easy card to put together: if you are not using a cutting machine like Silhouette Cameo or Cricut, it will take a little bit longer to cut the pieces… but not a HUGE amount of time, as the pieces are big.

Here is what you need if you are going to make the card

  • 2 colour Card stock for the card
  • Scrap pink cardstock
  • Scrap red cardstock
  • 1 colour for cat head, and body
  • 1 colour cardstock for tag
  • pen
  • glue.

Cut out the pieces

  • Download the link to my template below and print out. You can use as is and cut the images out out use the image to cut your own colour choices.
  • the two card bases are cut from 2 different colours. I used pink on the outside and grey on the inside
  • Cut the body and head of the cat out of one colour cardstock
  • Cut the nose out of pink cardstock and Tongue out of red cardstock
  • cut the tag pieces out.
cat body and head, nose and mouth as well as the first inside card base

Glue it all

  • Use the smaller card base and glue the back of the cat with tail onto the top of the card, glue the paws down to the bottom of the card.( right close to the centre line where the card folds. Glue the middle of the cat on to the cat a little way down from the tail.
  • Next add the nose and mouth to the head of the cat.
  • glue to the head to the front of the cat .
  • Glue all to the body of the cat.
  • next write your message on the blank tag provided or print the tag with the quote of kindness to animals.
  • I used dimensional foam tape to attache two tags and then glued to front of card.
  • Glue the inner card with cat inside the larger outer card

Hope you card turns out fabulous!

Here is the link to the template to cut and use your own colours or print with my colours.

Categories
10 minute craft Cards Celebrations Free Greeting Cards Kids Can Do Paper Pop Up Cards Template

Pop up Tulip Card for Mum

Tulips can be use for a Mothers Day card or Spring or get well card: It’s a pretty generic image.

The pop up card we will make today is from my Pinterest board that I saved as it looked so easy to do.

And, it is very easy! My template took less that 10 minutes to cut: that included changing paper colour and reloading the mat. It took me about 5 minutes to glue everything together.

If you have a Silhouette or a Cricut machine, you can use my free template to cut everything you need for this card (SVG, STUDIO 3 Files included) . There is also little tag to cut out and put on the front of the card if you like.

Don’t own a Silhouette or Cricut Machine? No worries, I have included my pdf version for you to print.

Steps to make the Pop up card

  • First of all cut all the pieces needed: the inner card base that has the cut in the middle, the outer card to use as a cover and the flower and leaves parts.
  • Next you need to fold 2 of the flowers in half and glue them on to the third flower at a slight angle. the top of the flower looks like a “W”
  • now glue the flower onto the pop up strip
  • attach the leaves
  • Line up the edges of the inner card with the outer card and apply glue.
  • Write your sentiment or print the one I have included.

Download the template here

Categories
Celebrations Free Greeting Cards Pop Up Cards

8 Steps to making a Tunnel Card with a Christmas Scene V2.

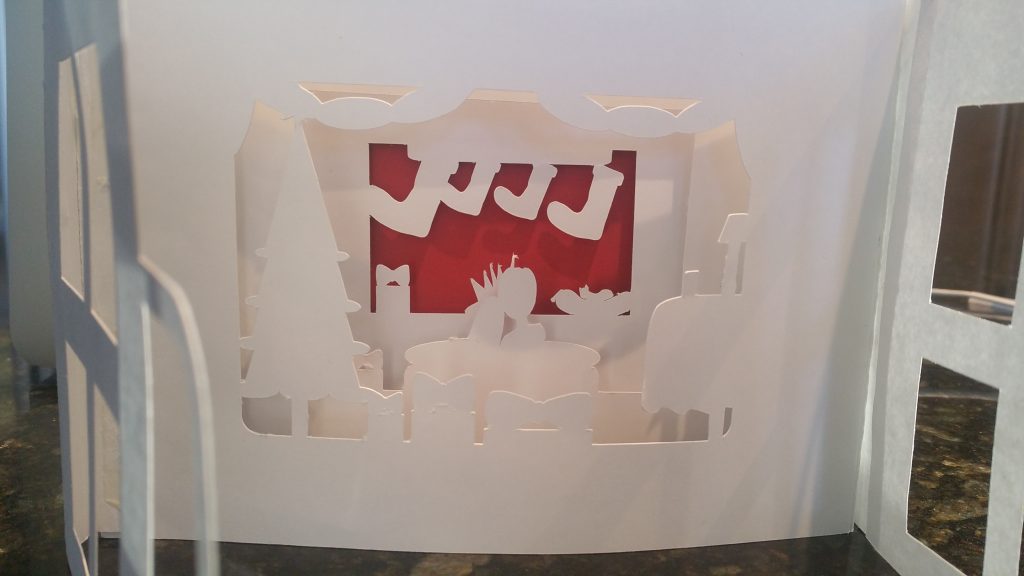
I made another version of a tunnel card with windows that open and close.

When I made the card and assembled it I realized I need to do a few adjustments, so I will share the steps on how I put the card together, but  the link to download is the  updated version.

First step

First of all, I wanted to have a “cover” for the card that wrapped around it, so this is what I came up with:

  1. A solid back, made from cardstock that is is 100 lb weight, this also has side tabs to stick the panels on.
  2. The bent sides shown here is where I will stick the bookbinding inserts shown in  the next step below.

20161214_140806

Second Step

The bookbinding method I am using is a little different from the first card. This method has 3 mountains and 4 flat spaces.

The card stock is 100 Lb weight and I found it a bit too heavy. I also think that I like the first method in my previous post of attaching and spacing the panels.

As you can see from the photo below, the image on the right is the flat paper with score makes to fold and the image on the left is the folded mountain piece.

it is important is to make sure the mountain parts are very well stuck together.
20161214_140704

Third Step

I added a bit of color to the background piece (Red Card Stock). This was cut on regular cardstock, 50 lb paper.

The two short sides are glued down and so will the bottom edge.

This will form a pocket and allow for an insert. The insert is for writing a greeting.20161214_140850

Fourth Step

The red back piece is stuck first then the window side panels.

The windows in the updated version will be held close with a Christmas bell, for this version it did not cut as expected.

The bookbinding pieces go next.

20161214_142313

Step Five

Start with the 3rd panel, the one with the smallest opening with the stockings and fireplace,

Attache the edge to the closest “mountain ” tab.

Next attach the 2nd panel, the one with the couple on the sofa

Last is the panel with the Christmas tree and gifts.
20161214_143050

Step six

Attach all the panels to the other side in the same order.

It would have been very easy if I had not attached the bindings to the back of the card in step 4!

Insert the roof with Santa stuck in chimney  into our little red pocket.

Step Seven

All attached but not yet complete! Cute right? As you notice, my windows have cutout panels.

Step Eight

You need to write a greeting so here is the prefect spot to place it: this tab has Santa stuck in the chimney…so grab his little foot and give a tug!

Here are the studio 3  files in Dropbox, it is for personal use.

Carolyn.

Like us on Facebook and post your card