Categories
10 minute craft Creating files Free Paper Silhouette Tutorial Template

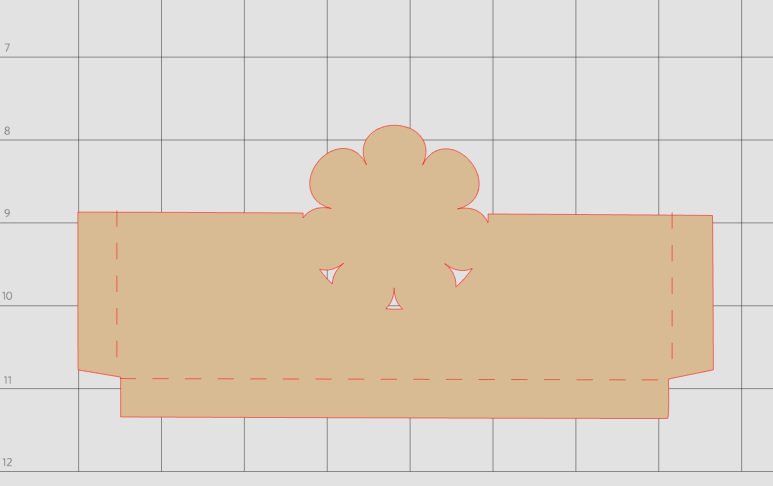
7 Steps for Custom Pocket

For my brag books I use templated pockets, tags, pages etc. and customized them for each brag book that I make. The customization can be from welding images to adding embellishments or even just decorative paper.

In this post I will show you step by step how to customize a flap or pocket that involves cropping and welding to give a lovely cut out effect. This technique can be used with any item and design element.

Step 1 Item to customize

Once you know what you want to customize, make sure you have resized it to fit your project. There are so many uses for this technique that it is difficult to list them all. I am going to use a narrow pocket and a flower image that can be inserted in a brag book. Your project could be part of a greeting card, scrapbook layout, wall hanging, sign, stencil and more.

Step 2 Design or font to be used

I use designs I create myself as well as designs and fonts from places like Silhouette Design Store, Creative Fabrica (my affiliate link), designs from Google search, Pixabay and more. As mentioned, I am using a flower image.

Some important thing to consider are:

  • Make sure that your font/design is not too delicate as it may rip easily
  • If you font or design is thin, use an offset of about .005 to make it easier to cut.
  • If the design or font is too intricate or small as it may rip while cutting, try to use simpler larger designs
  • Look for smooth curves vs sharp angles

Step 3 Arrange your file

Arrange your items in Silhouette Studio so that you are happy with the finished size of the project. If there are multiple layers like score line, ungroup all layers first.

Step 4 Cut out a space

Next you need to cut into the narrow pocket. To do so you need a size cut out of the pocket that allows your design of the flower to fit in to the space but have a little over lap. I am using a circle to cut out the space I need and it is a tiny bit smaller than the flower design.

Step 5 Subtract

Next, position the circle so that it is in the middle of the pocket. I am using only half of the circle to cut into my pocket as seen in the photo below. Once you are happy with the look of the cutout section, use the subtract feature.

Step 6 Weld

Position the image (flower) in the space created and once you are happy with the result, choose WELD feature.

Step 7 Finish up

Notice that the image of the pocket has no score lines (dashed line) that is because once you use the weld feature, it brings the result to the front. To correct this, send the image (pocket) to the back so that score lines are visible

Categories
Creating files Mini Album and Brag Books Paper scrapbook

Wedding Album/Brag book

When I was making my Halloween Brag book I had this wedding album in mind, and although the dimensions are different (8 x 8) from the Halloween brag book, I knew that the digital files were going to be very easy to modify.

The album base I got on sale in Michaels and painted it white. so I did not build my own cover , spine and binding. If you want to do so yourself I cover it here.

I wanted to cut ALL the inserts out for ALL the pages and then start assembling and photographing the pages and posting BUT got to page three and looked at the amount of stuff I had cut out and WOW… I am starting to get a bit confused as to what goes were!

So, I am pausing all of that the cutting madness to go through the album, of what I have so far, and catalogue it here on my blog.

I will post both my screenshots of the modified files and the cut files. Note that there is no decorative page matting or embellishments cut out yet and I will post each page as I assemble them

The Album Base

As I mentioned, I did not build the base album from scratch but got this one on sale in Michaels. My Halloween base was built from scratch and if you want to make your own you can review the process here: Brag book Base

I am trying to keep all the pages as close to the Halloween layout in order to show how ease it is to adjust the digital files I developed. I may rearrange the layout as I go along to illustrate the flexibility of these files, because I know I won’t be able to resit reorganizing them!

Paper and Embellishments

  • Base pages white Cardstock 8.5 inches x 11 inches from Recollections 65 lb. I was going to use the heavier weight Cardstock but I think it will make the album too bulky.
  • Decorative paper for matting is Recollections Wisteria 12 inch x 12 inch.
  • Decorative paper from Dollar tree Metallic silver 11 inches x 14.28 inches come in a pk of 5 different colours for $1.25
  • Silver Vinyl
  • Embellishments love birds purchased and free.
  • Other wedding symbols to be determined
  • Quotes to pint or cut to be determined.
  • Magnets for closures
  • Ribbon and other nick knacks as I find them

Will add as I go along but this is the basics of what I intend to use.

Measurements for this project

  • The Cover Measurements : 8 inches x 8.5 inches.
  • The base page will be 8 inches x 8 inches and allow for a large photo mat 7.75 inches x 7.75 inches insert.
  • The matting for base pages will have a 7. 75 inches x 7.75 inch

Subscribe below and get my free files

[wpforms id=”1223″ title=”false” description=”false”]

Categories
10 minute craft Cards Celebrations Free Greeting Cards Paper Template

Shadow box card in 10 min

Have you seen those awesome shadowbox cards that are 3 dimensional and look like an artist, graphic designer and engineer must have collaborated to make it? Also You can buy these cards for $2.99 and more but why would you when you can make your own?

If you have not see theses cards then you are in for a treat because not only will someone love getting one from you, I will give you the basic template and you can customize as you see fit.

Shadow Box Card

Ok now lets back up a little and give you some ideas of what I am talking about and then we will go into what you need to make these cards. Below is a Christmas Santa card that I made a few years ago. Notice that there are layers and this gives the 3D effect. These cards are called shadowbox or tunnel cards.

Christmas Shadowbox card
Christmas Santa delivering toys

This Santa Card what cut on a Silhouette Cameo Machine, so for those of you who own a machine like this, I will show you how to use my template to make any card you like.

For those of you who don’t own a machine, I will show you how you can still make beautiful tunnel cards, just will a little bit extra work like the one below. This will be a separate post that I will put up later. In the mean time, download the free template and use any pictures or embellishments ….for all you know, you may end up with some tricks to show me!

So, for those of you with machines like Silhouette Cameo and Cricut, the first thing you will need is my template for the card itself. You will need to open the SVG file in Silhouette Studio. see my post here.

If you can’t open SVG files let me know and I will send the studio files.

Now that you have the template, think about what you want the card to be about and spend a few minutes looking for free images on Google. I wanted a beach scene as summer is on the way. Here are some of the images I found. I used the trace feature to trace them and then resized for my card.

In my free template, I included 2 images that looked like “hills” or “clouds” I use these to create different heights for each layer and welded it to my frame. Remember to ungroup the fold lines (dashed lines) before you weld.

Next I arranged my images and welded to card pieces. Below are the pieces cut out and compared to the template with no images welded.

Assemble

  1. To assemble the card bend all the fold lines.
  2. Lay the back piece flat
  3. Glue the tab of inner card so that it is up against the fold line. The tabs of each card is great for spacing if you place them right up against each other.
the inner card is glued so that the tab is up against the fold line
the next layer is glued right up against the edge of the last.
you can see the layers here
This is the back. the tabs have glue on then and we close the large brown piece on top and press down.
Shadow card with beach scene
Shadow Box: summer at the beach

Carolyn

Categories
Celebrations Free Greeting Cards Pop Up Cards

8 Steps to making a Tunnel Card with a Christmas Scene V2.

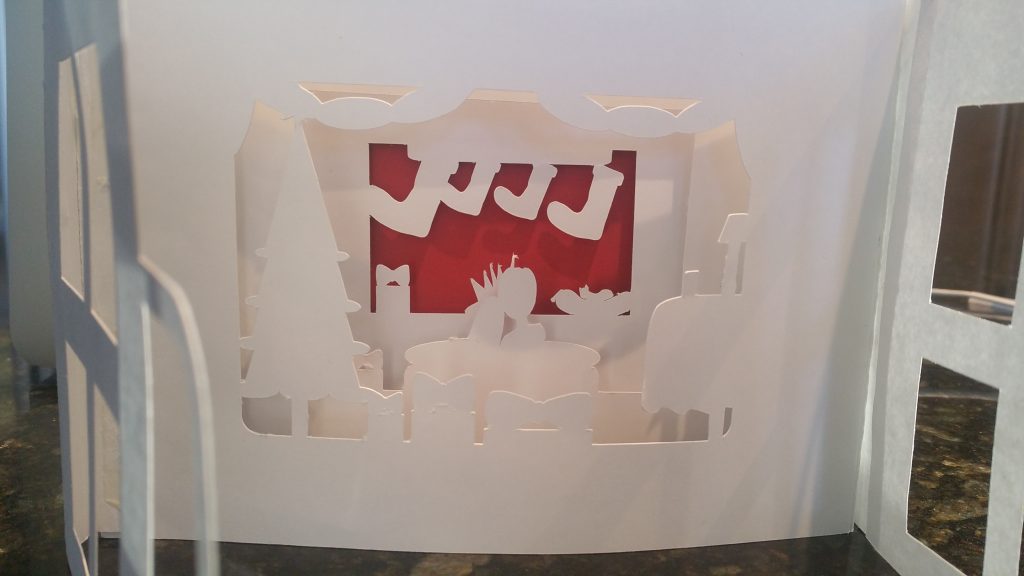
I made another version of a tunnel card with windows that open and close.

When I made the card and assembled it I realized I need to do a few adjustments, so I will share the steps on how I put the card together, but  the link to download is the  updated version.

First step

First of all, I wanted to have a “cover” for the card that wrapped around it, so this is what I came up with:

  1. A solid back, made from cardstock that is is 100 lb weight, this also has side tabs to stick the panels on.
  2. The bent sides shown here is where I will stick the bookbinding inserts shown in  the next step below.

20161214_140806

Second Step

The bookbinding method I am using is a little different from the first card. This method has 3 mountains and 4 flat spaces.

The card stock is 100 Lb weight and I found it a bit too heavy. I also think that I like the first method in my previous post of attaching and spacing the panels.

As you can see from the photo below, the image on the right is the flat paper with score makes to fold and the image on the left is the folded mountain piece.

it is important is to make sure the mountain parts are very well stuck together.
20161214_140704

Third Step

I added a bit of color to the background piece (Red Card Stock). This was cut on regular cardstock, 50 lb paper.

The two short sides are glued down and so will the bottom edge.

This will form a pocket and allow for an insert. The insert is for writing a greeting.20161214_140850

Fourth Step

The red back piece is stuck first then the window side panels.

The windows in the updated version will be held close with a Christmas bell, for this version it did not cut as expected.

The bookbinding pieces go next.

20161214_142313

Step Five

Start with the 3rd panel, the one with the smallest opening with the stockings and fireplace,

Attache the edge to the closest “mountain ” tab.

Next attach the 2nd panel, the one with the couple on the sofa

Last is the panel with the Christmas tree and gifts.
20161214_143050

Step six

Attach all the panels to the other side in the same order.

It would have been very easy if I had not attached the bindings to the back of the card in step 4!

Insert the roof with Santa stuck in chimney  into our little red pocket.

Step Seven

All attached but not yet complete! Cute right? As you notice, my windows have cutout panels.

Step Eight

You need to write a greeting so here is the prefect spot to place it: this tab has Santa stuck in the chimney…so grab his little foot and give a tug!

Here are the studio 3  files in Dropbox, it is for personal use.

Carolyn.

Like us on Facebook and post your card