Categories
Creating files Mini Album and Brag Books Template

Making The first page of Brag book 101

After seeing all the beautiful projects on YouTube I really wanted to start building my pages, it is so exciting! Well, I needed to decide what my base page would look like. I decided to go with the “sleeve” page…this is made to two pieces of paper glued on the short ends and the long open ends are attached to the spine, or open for a tag to be inserted. This type of construction seemed sturdier to me; I could be wrong but that is the method I am going to choose.

Once I chose the type of page, the next consideration was the hinge method for the binding. Well did you know that the hidden hinge method is copyrighted/ patented?I DID NOT KNOW!

I did my version of a bookbinding hinges with different spacing and score lines. There is also stack the deck method that looks good. For an example of the hinge I use check out my Shadow card

Now, what will I include on each page?

With so many ideas running through my head, I feel paralyze and decide to sit back to watch people craft on Youtube. It really is entertaining, and I love it!

Eventually, though this blog post keeps calling and it won’t write itself so I decide “I can do this!”  and start my page.

These pages are going to be Halloween themed ( coming up really soon! and I am creating them in no particular order. I also decided to make a wedding album since the pages will be the same only the embellishments and paper will be different! I am going to illustrate only Halloween but I will post my wedding album that will use the same files so you will see how flexible the digital files are.

First the digital file

Screenshot 2017-10-05 09.59.21
Screenshot 2017-10-05 10.05.23
Note that Light blue is just the digital color, I will use cardstock from Recollections Ravenshead Manor collection
Screenshot 2017-10-05 10.08.48
Gate on left, matting for behind gate on right. In the middle is what you see when the gate opens: a pocket with a tag.
Screenshot 2017-10-05 10.11.58.png

The Cut files

When I cut these files with the Silhouette Cameo, I noticed a few adjustments needed to be made.

On side one:

  1. the gate was too big
  2. the pocket under the gate was too large

One side two:

  1. the flap with the pocket would not close because the envelope with the zombie’s hands was too big!
  2. I redid the layout so that the zombie envelope is now on the outside, it also flips open. I added a flap to the inside and may add more see photos below

I have not stuck anything down as I am going to place magnets and cut the matting then glue it all together.

Each page really has two side that need pockets and flaps etc. so page one has a side A and a side B Side A will have the gate that opens to a pocket.

20171005_114744
This is the gate, I will have a mat at the back, the pink is just for visibility

Open the gate and see the pocket where I will have a tag in the shape of a tombstone. This pocket will be on a page that flips up and there will be place for 2 large photos.

20171005_114911.jpg
This is the pocket when the gate is open. I will have a tombstone tag for the insert.

Side B of page one:

This is the large envelope.

20171005_114942.jpg

The envelope flips over to the left. Space for photos.

20171005_115035
large envelope with Zombie hands

Again the page flips and there is a pocket to the right and a pocket to the left. The pocket with zombie hands is on a flap that opens for large photo mats…..see next photo.

20171005_115058.jpg
20171005_115209

It took a bit of time to mat the pages and there are a few places that still need matting. When doing the matting I placed my magnets first but found they were very thick so went and got some thinner ones but alas, they are not holding very well…next page I will try a different brand.

I am not going to attach to my binding until all the pages are complete because I want to make sure that I am absolutely finished adding flips and flaps to my page.

So here is the first page:

Side A of page one with the gate, now with the matting. I did not get a chance to go looking for cute doorknobs so I used small brads. This was one place my magnets did not hold. EEKS!

20171006_100630

When the gate opens there is a pocket with zombie hands and a tag. the flat space behind the tag can hold a photo and the tag can be shorter.

This is to show the space for a photo mat that I have not yet completed but each page will have one in the side pocket.

20171006_100803

Side B of Page :

A hinged page pulls to right for photo mat space. On the other side of the zombie’s hands is an envelope

20171006_100935

this opens to reveal another envelope no matting yet and the page opposite has another large envelope with more zombie hands

20171006_101009

This zombie envelope is on a page that flips up

20171006_101054

That is the end of the first page…..

I use the tombstone and zombie hands from the Silhouette design store and the paper is Recollections  Halloween Ravenshead Manor collection.

For my template page subscribe and email me your request.

[wpforms id=”1223″ title=”false” description=”false”]

Carolyn

Categories
Mini Album and Brag Books Template

Working on the Brag book Cover

Scared yet?

I have to say that this step took a long time for me to begin as I was feeling out of my comfort zone and just not certain if this cover will be what I wanted.

Take it from me, now that I have done the cover…no need to freak out! Follow my instructions or look up video instructions…lots of information out there and have fun, make mistakes and move on!

Step One: Make your cover

I first needed to buy medium density chipboard but I was not willing to make a trip to Micheals or wait for Ebay or Amazon delivery…LOL…sooooo I and went looking to see what I could substitute. I found stacks of very thick photo mats in my garage and cut it down to size (9 in x 9in ) with my Exacto knife. So far so good.

Tip

As I make each piece of this brag book, I am creating the digital templates AKA the Digital SVG cutting files and PDF files so that the next book will be a breeze. If you decide to make your own book from scratch, consider doing the same.

Step two: A Decision to make.

Now the decision was to lay the pieces out on one sheet of paper and wrap front, back, and spine together or wrap separately.

1, Here is an example of a cover wrapped in one sheet of paper (video at about 32 minutes in) This video is also a great resource for making a brag book.

2, Here is a video with an example of the pieces wrapped separately and joined. This is from one of my favourite brag book creators Jen of Eve

I am going to use method # 2 for a few reasons, but the main reason is that I want to make bigger albums and to find paper large enough to do a one-sheet wrap is not easy.

Cover, Spine and Binding cut

Here are my front and back covers and spine cut from matting material I am using 9 x 9 as my size. I did not use my Silhouette to cut these but you can use your machine with a deep cutting blade. If you want to skip all the measuring and just want the SVG files to cut , then subscribe and the message me: I want your Brag Book cover package and I will send the files for the cover and spine and the files for the wrapping.

Brag Book Cover and spine
“chipboard ” pieces for the book cover and spine

Here are the front & back covers, and the spine wrapping cut out. I used 12 x 12 sheets to fit the 9 x 9 cover size with a 1/2 inch tab allowance for glueing. Dollar store Bristol board works well and all you will need is one sheet

Here are the front and back of the cover with the cardstock wrapping glued on. The spine cardstock is not attached to top and bottom of the spine yet and will be attached next.

20170930_204509.jpg
IMG_20170930_205446.jpg

Everything is covered up and this is the finished cover and spine

If you want the digital cut files for the cover, spine and binding , subscribe to my blog and send me a request.

Next post: the page binding: found out some interesting information!

Please subscribe for my blog, i would also love to know what you want to read about.

[wpforms id=”1223″ title=”false” description=”false”]

Carolyn

Categories
Mini Album and Brag Books

What Size should it be?

What is Too small or Too big?

What is the ideal size for a brag book? In some of the tutorials I viewed, the brag book was closer to a mini album than a brag book.

Which brings me to another question I had as I sorted through the mass of material online: what separates a brag book from a mini album?  

As far as I can tell, its size and to some extent, complexity….by that I mean how many flips and flaps, pockets, tags, and belly bands an album has.

Another feature that brag books tends to have are different methods of binding the pages together.

As the name implies, brag books are made to showcase something you wanted to brag about … its used in business to showcase skills, testimonials etc and for the craft sector it would be used for a new baby, a grandmother/ father to have the grandkids photos in, weddings, travel memories and more.

If anyone has a true definition, I would love for you to comment below.

My goal

Is to develop all the components of a brag book in digital file format and PDF that can then be used interchangeably to create interactive, unique brag books easily with many different looks and feels.

I also hope to incorporate techniques I am not seeing in my search to give a WOW factor each and every time.

Back to size: there were a few page sizes I considered

  1. 6.5 in. x 8.5 in.
  2. 8.5  in. x 8.5  in.
  3. 5 in. x 7 in.
  4. 6.5 in. x 6.5 in
  5. 7 in x 7in

Sizes I Like

  1. I really liked the  6.5 in x 8.5 in.  size for a few reasons, first because it fit 8.5 x 11 in. cardstock, also it allowed for a potential of two  4 in x 6 in. photos.
  2. The 8.5 in. x 8.5 in.  fit 8.5 x 11 in. cardstock and allows for the 8 in. x 8 in. pads of paper for matting. Similar with the 6.5 in. x 6.5 in. page as it allowed for the use of 6 in. x 6  in. paper stack.
  3. I found a blank base already bound that is 8 in x 8 in, so if I use this pre-made book pages I will skip the steps for making the cover and pages and my files will be tailored for the 7 in x 7 in page clearance.

Binding methods looked at:

  1. Stack the deck
  2. Coptic stitch
  3. Hidden hinge (trade marked)
  4. Accordion hinge
  5. The popular method seems to be stack the deck, and I am researching if this is the method I will use. For my TUNNEL / SHADOW card, I used a version of the hidden hinge which I really liked.

My Pinterest board has pins for binding methods and for brag book ideas

The saga continues next post with making the digital pages.

Please join my mailing list for every free file I post

[wpforms id=”1223″ title=”false” description=”false”]

Carolyn

What feature do you love most in a brag book?

Do you have a true definition of a brag book to share?

Categories
Mini Album and Brag Books Paper

Making Of A Brag Book

At last, I have started the process of creating a brag book from scratch. I must admit that this has
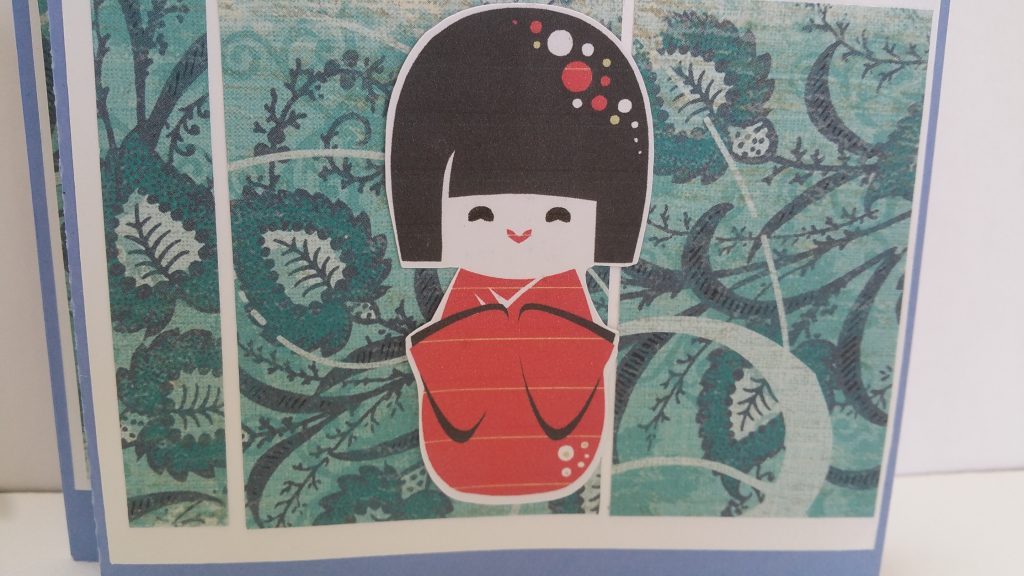
 been a prolonged process because of how I do things:

My Thinking Process

  • I need to look at as many examples as possible,
  • Collect the ideas and then sort through them
  • Choose my favourite. 
  • A bit of procrastinating is involved and sometimes I feel overwhelmed by all the information out there.
  • Eventually, I start to see the light at the end of the tunnel and I get started.

Looking At examples

So the first step was looking at examples and collecting ideas : I pinned the ideas on Pinterest, great way to get organized! For those of you who want to start this process and are like me, here is my board Mini Album and Brag books

There is maybe duplicates as I did get a bit carried away! I also used youtube to look at tutorials online, there are so many amazing ideas on creating Brag Books!

Making Decisions

Once I finished looking at the examples,  I figured that what I liked most were brag books with templates pages that can be used in many ways.

Heartfelt creations was one such maker and another was Jen of Eve designs , both of these brag book creators gave me the sense that their templates can be used to create many variations of a brag book.

I liked that Jen of Eve design has templates that can be stored in a binder and when you are ready to make a brag book, you just have to photocopy the pattern onto cardstock and cut it out by hand. There are many who do not own cutting machines like Silhouette Cameo, Circuit, Brother machines etc. and SVG files would be useless.

With Heartfelt Creations, the brag book and all the inserts came precut and you just had to assemble and put your own matting and photos.

Decoration A paper

This is a good time in the planning process to look :

  • At what decorative paper you will use and what
  • Embellishments and images needed. I use free images from Creative Fabrica that are for personal and commercial use.
  • Who is the book for? I am going to make a brag book for a newly wed but the template will be adaptable for any type of brag book.

In my next post, I will start the actual process I went through to make my brag book digital file and PDF version.

Till next time,

Subscribe so you won’t miss a post!

[wpforms id=”1223″ title=”false” description=”false”]

Carolyn

Categories
Cards Greeting Cards silhouette design store

Wiper Card and KOKESHI CARDS

From the Silhouette Store by Valerie Foster Design ID #7183

Egads! What is a wiper card and WHAT on earth is a Kokeshi card?

Well, you are in for a pleasant surprise. I was pinning stuff on Pinterest and came across wiper cards tutorial on Youtube.  

I was intrigued! I love any paper projects that has movement in it and this one did.

Basic explanation

When you pull on the sides of the card, there is a piece that pops up. Take a look at the video for a way better feel of how neat this project is.

I looked at the video, made notes and created a digital file so that I can share this with you all. I did find the measurement (slightly different from the video) written out and pinned it to my board, so go take a look if you want to make this but need to cut it all out by hand.

So that takes care of the wiper card part.

What is a Kokeshi card?

The Kokeshi card are cute Japanese doll cards I got on The Silhouette Design Store and I used parts of them in this project.

The project parts

Here is a look at the pieces you will need. This is a mock up on my computer so the actual cardstock I used was blue.

The solid pink is the body of the card. The polka dots are decorative pieces and the grey is the wiper arm.

I cut my card out of  plain blue cardstock. So the two large “pink” pieces are in reality blue below and folded along score lines.

Assemble card

  • Base is cut out
  • Using the measurement given, cut out the white matting for the front and decorative pieces for the side panel mat
  • You can use your own measurements and decorate the front with any measurement of patterned paper you like, there is no one correct way.
This is a modified version of the decorative pieces
This shows the decorative pieces that are in the file
  • Once the front was decorated, I glued the wiper arm piece of the project to the inside of the front of the card.
  • My downloadable file below has a small score line to help line this up.
  • Once the pop up arm is lined up and glued down, attach the back piece so that the “Z” shaped folds are on opposite ends. (see photo at the top of the post with the blue card pieces)
  • Decorate with your choice of images. I will use my card as a “hello” card with the Japanese translation on the back “Konnichiwa”

Pulling the sides allow for the two dolls to disappear inside and pop up again.

As I mentioned, I used the dolls from  KOKESHI CARDS by Valerie Foster Design ID #7183 . This design is for 3 cards so head on over to The Silhouetted Design Store and grab the adorable dolls or any one of thousands of other images that can be used.

Thank you for reading and I hope you get to make this card. Subscribe to my blog as I will keep posing files and ideas.

[wpforms id=”1223″ title=”false” description=”false”]

The PDF file below is for the main body of the card. For decorative parts you can do whatever you like.

This link is for the SVG file to cut using Silhouette or Cricut

Categories
10 minute craft Baha'i Holy Day Ideas Kids Can Do Paper Template

Feast of Words/Kalimat

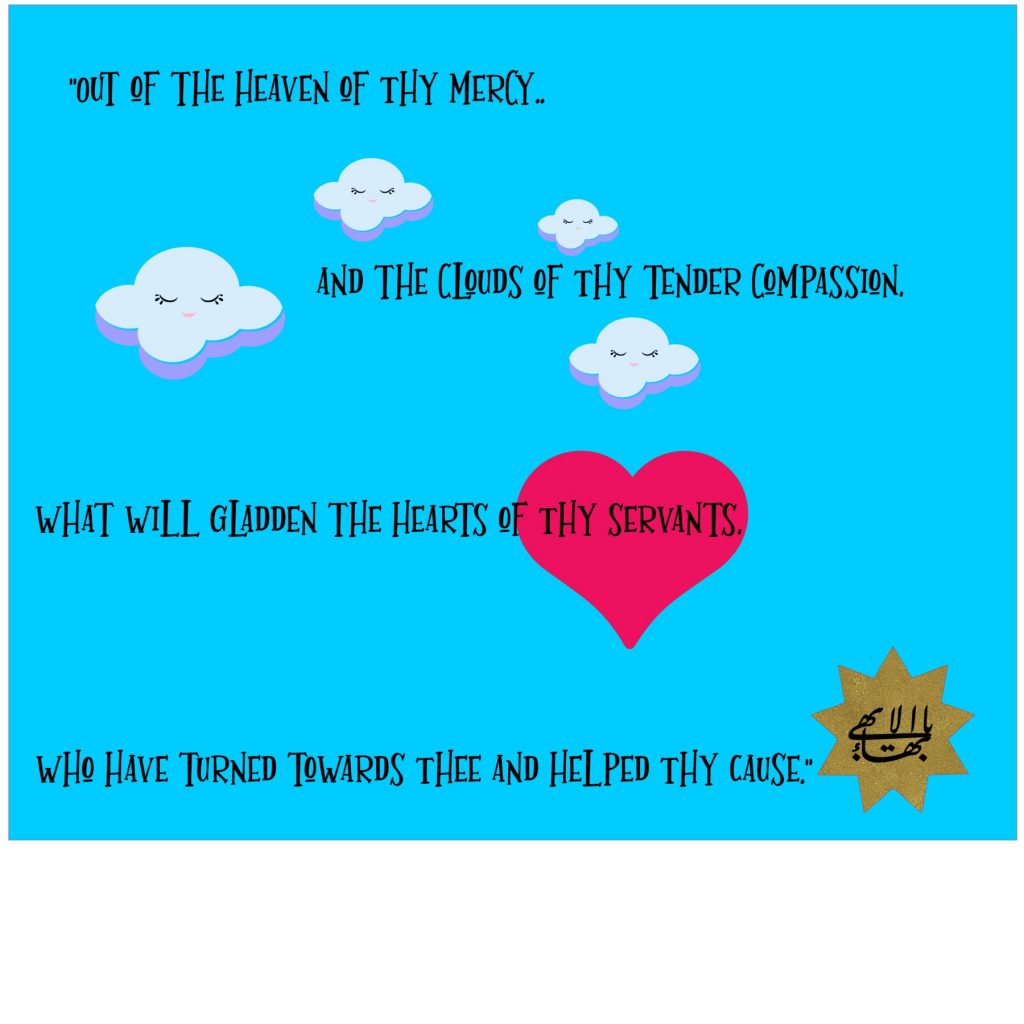
“The Word of God hath set the heart of the world afire; how regrettable if ye fail to be enkindled with its flame!”

Gleanings From the Writings of Bahá’u’lláh … – Bahá’í Reference Library

Welcome to the resource for the Feast of Words. First a few suggestions on activities that are not craft related:

Play a word game using simple words the child can recognize such as : “We”, “Are”, “Baha’i”, “love” etc.

Cut out blank cards or use index cards and write simple words on them . A word game like go fish can be an activity to play or just use the cards as flash cards.

Craft: make the card (template  below) to give to someone at feast 

This is the coloured version that can be used on a card or to frame:For the children, this is a very simple activity that takes 5 to 15 minutes.This craft uses cotton balls for the clouds, Sparkles if you want to add to the sky or cloud or the Greatest Name, and the template picture to colour in. 

Time: 5 minutes.

What you need:

  • Template
  • Cotton wool 
  • glue ,crayons, markers or paint
  • glitter

Method:

  • Colour in parts or the entire picture with crayons, markers or paint.
  • Glue cotton to the clouds.
  • Apply glue to areas you want sparkles on and apply sparkles.
  • Shake off extra.
  • enjoy

Here is my example…took 5 minutes. I used only paint and sparkles.

Feast of Mercy

Hope you have fun: template is below